# Custom Authentication V2.0
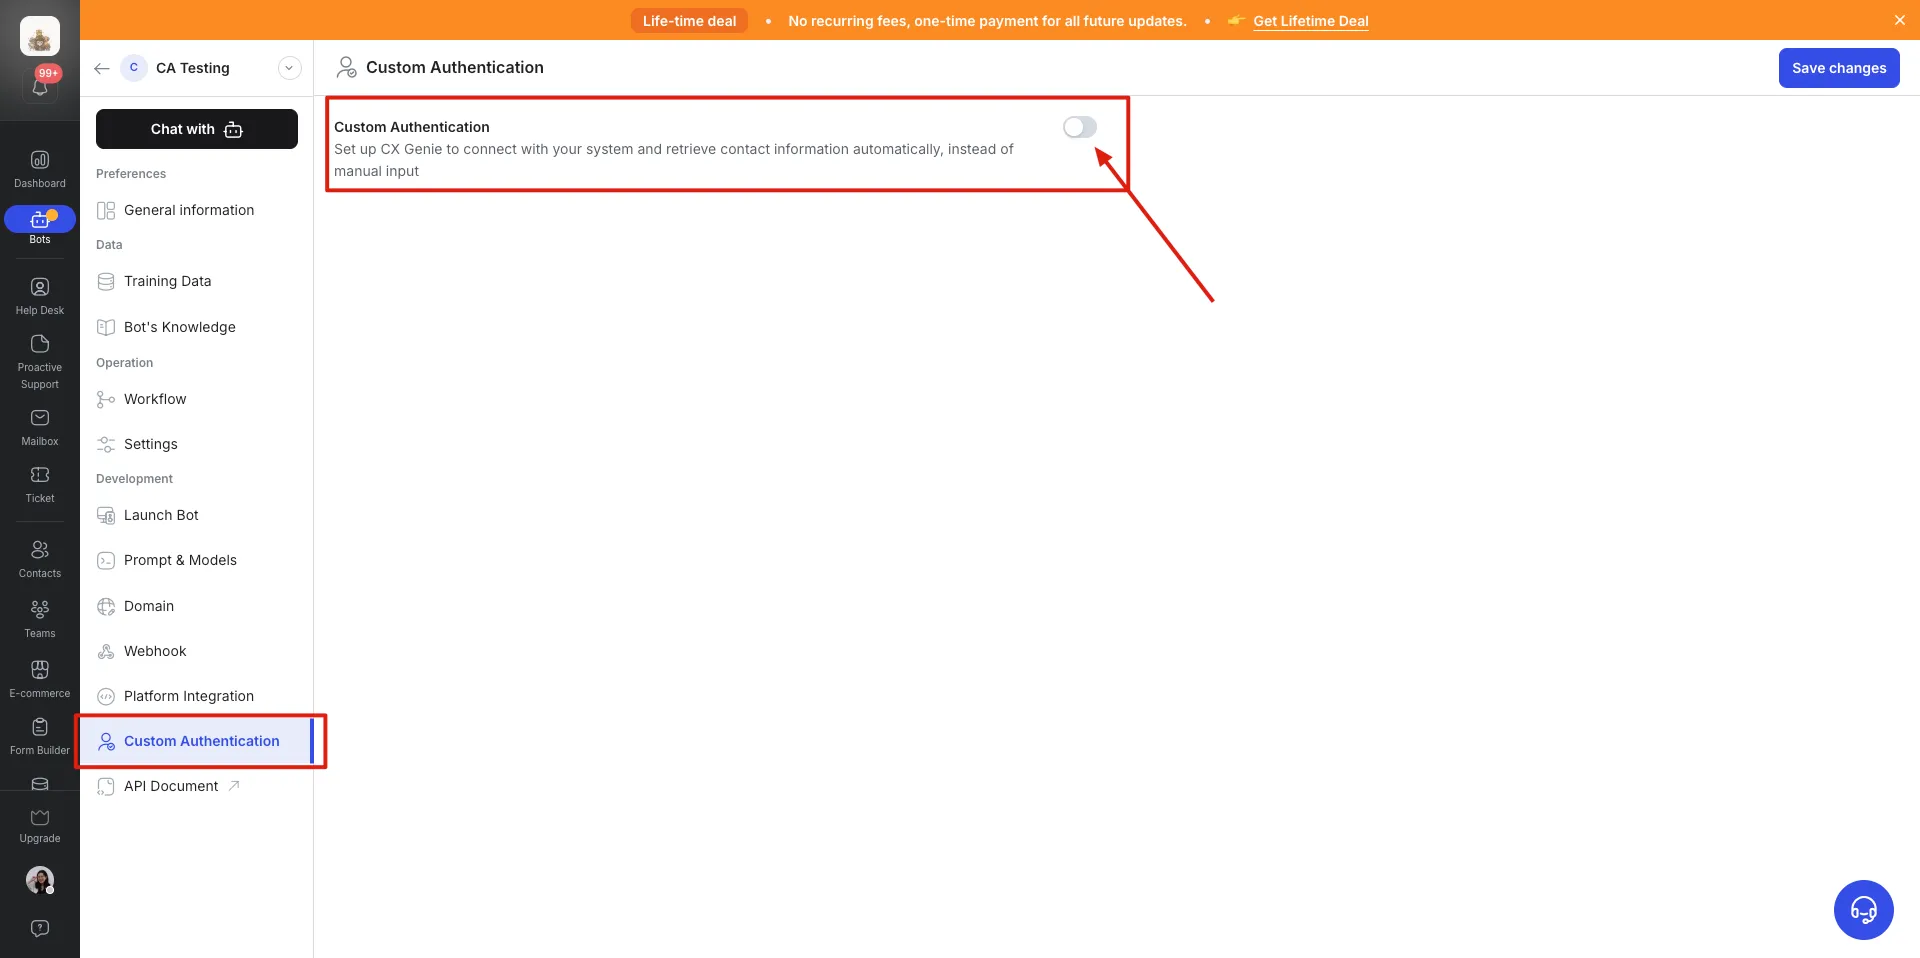
When users access the **Custom Authentication** section in the bot settings, they first need to check whether Custom Authentication (CA) is enabled.
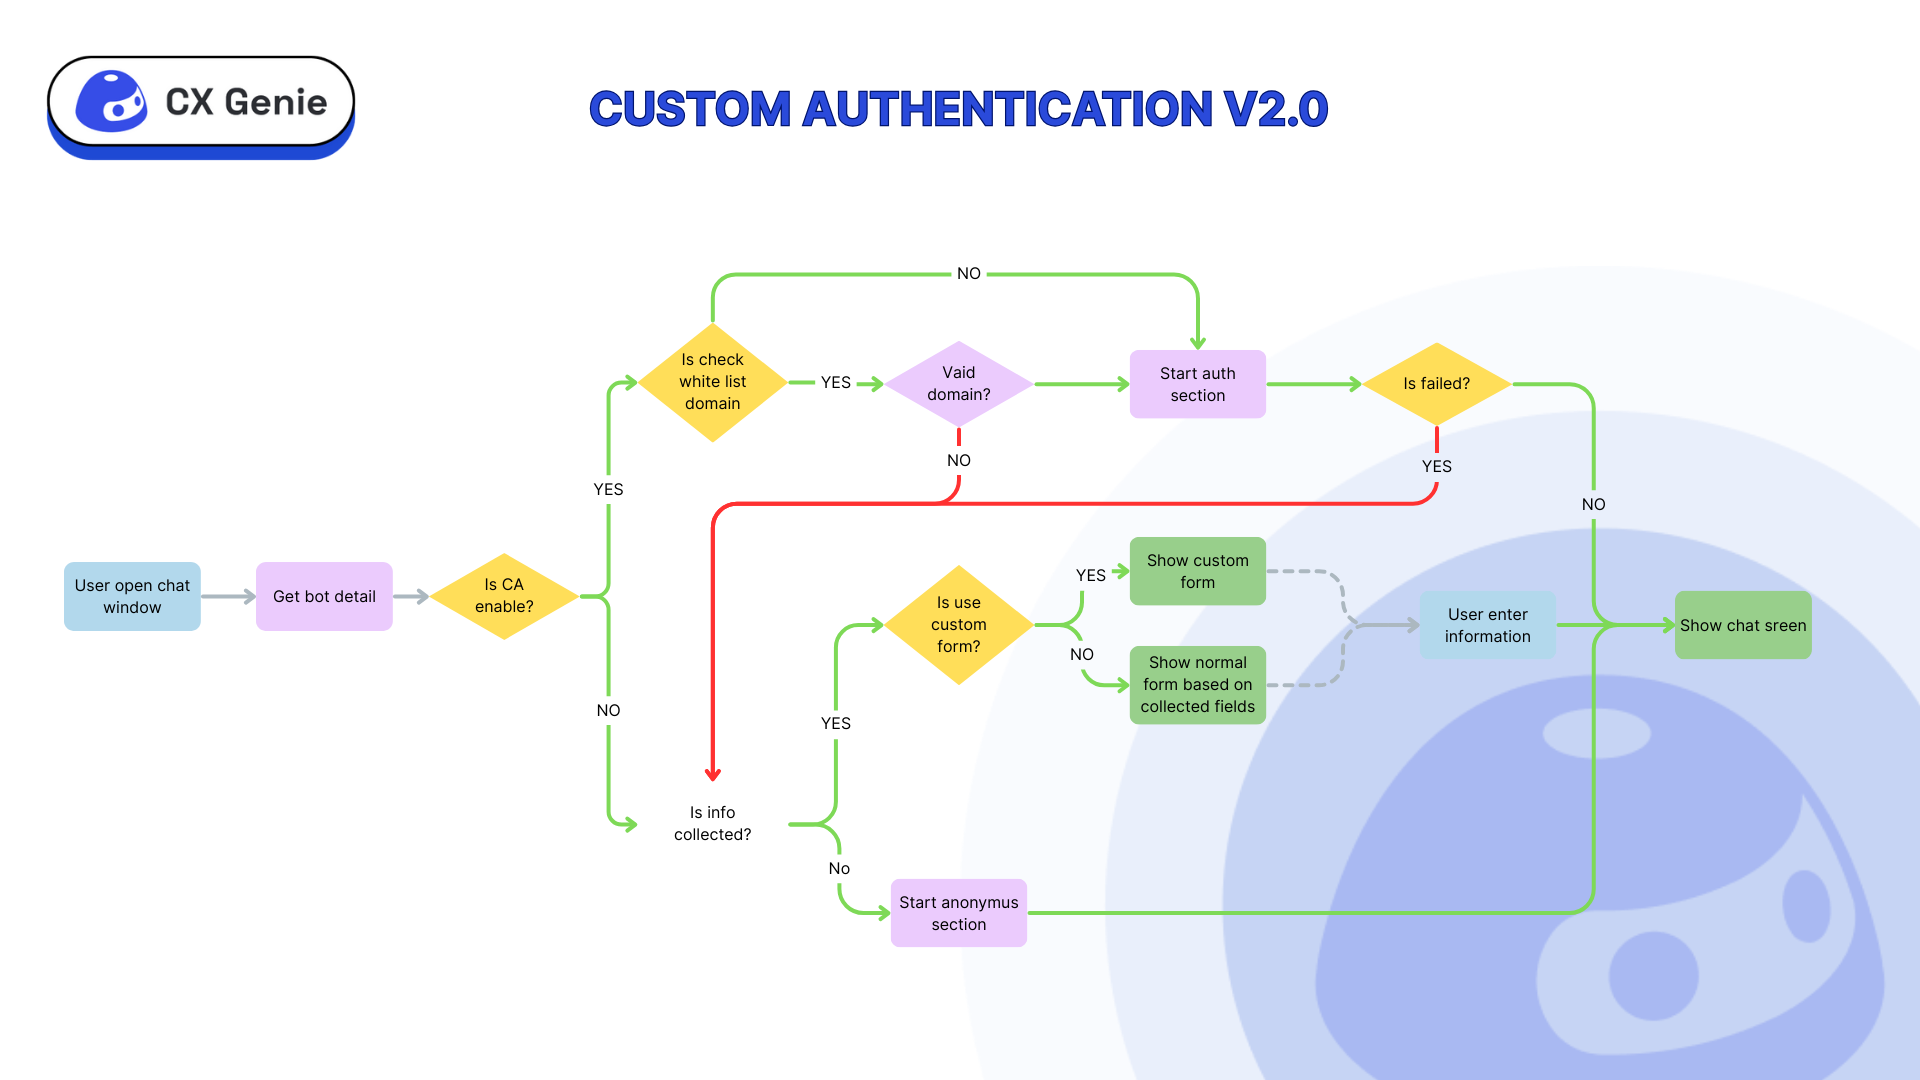
Custom Authentication Flow v2.0
### Custom Authentication Enable Flow
If it is enabled, the system will follow the CA flow — also known as the **CA-enabled flow**. The next steps are as follows:
#### **Step 1**
When a customer opens the chat interface (on the web or via the chat widget), the system checks whether the bot has Custom Authentication enabled.\
As soon as the chat widget is opened, it sends a signal to the system.\
The system receives this signal, identifies the corresponding bot, and verifies whether Custom Authentication is turned on for that bot.
#### **Step 2**
If Custom Authentication is enabled, the system will then check whether domain whitelisting is turned on and whether the current domain is included in the whitelist.\
If the domain is allowed, the system will proceed to start the customer identity verification flow.
> **Domain whitelisting** is used to control which websites are allowed to use Custom Authentication.\
> **If this setting is disabled**, the whitelist will be ignored, meaning any website with the chat widget enabled will be allowed to access the bot.
* **Get a domain list from an API:** The system will **automatically fetch** the list of allowed domains via an **API**.
* **Enter domain list manually:** You can manually input the list of allowed domains.
#### **Step 3**:
The system verifies the customer’s identity by exchanging data between **CXG** and the **user’s system**.
* When a customer opens the chat, CXG receives customer information from the user’s backend.
* CXG then uses the **Header token** (set by the user) to call the user’s API.
* The token typically contains an `access_token`.
* CXG sends the token in the request but does **not** know its contents or any other sensitive data inside it.
* The user can choose whether or not to send additional customer info (e.g., **ID**, **phone**, **email**) along with the token:
* **If nothing is selected**, only the access token is sent.
* **If fields are selected**, CXG will send those fields as well.
* It’s up to the user to decide which data to include — CXG doesn’t use or store these values for any other purpose.
> **Analogy:** Think of the `access_token` as a movie ticket, and the optional fields (ID/Phone/Email) as your ID card.\
> Whether you need to show the ID card depends on the movie’s age restriction — just like how the API may require more info based on the use case.
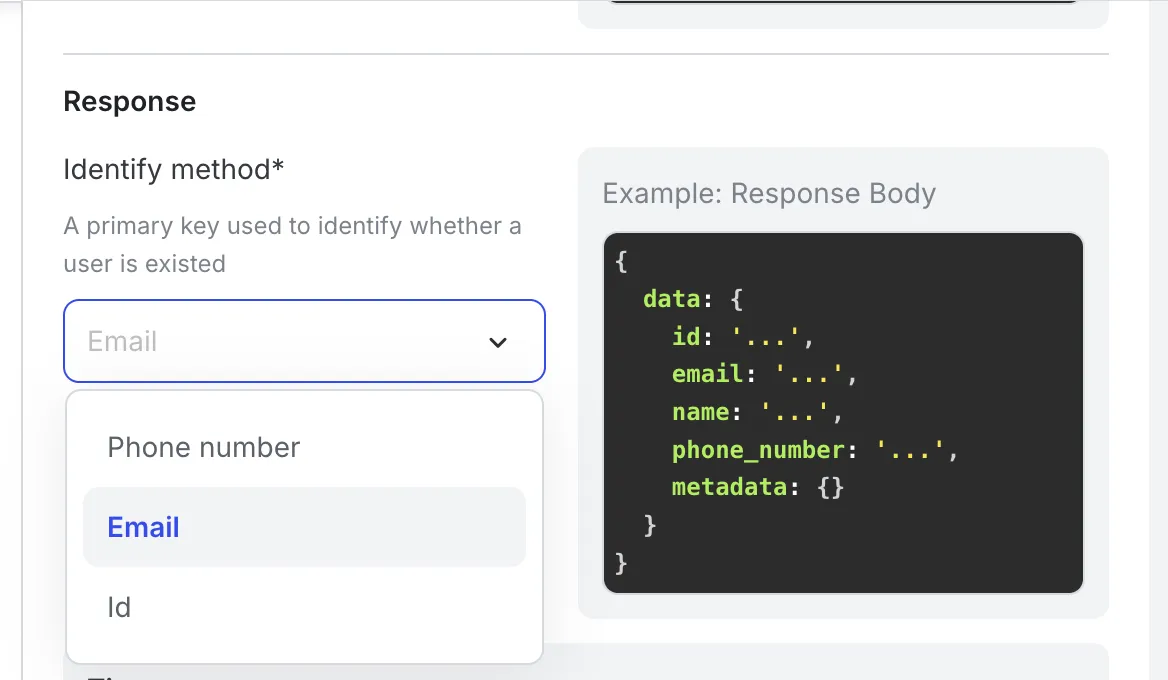
* CXG uses a **primary identifier** (ID, phone, or email) to match the current customer with existing records:
* **If a match is found**, CXG retrieves and uses that customer’s information (including metadata if available).
* **If no match is found**, CXG automatically **creates a new customer** with that identifier.
* **If a match already exists**, CXG **updates** the customer’s info with the latest data.
* The user must select **one field** as the **primary key** for matching.\
For example, if "ID" is selected, CXG will use the ID to search the user’s system via API.
#### **Step 4**
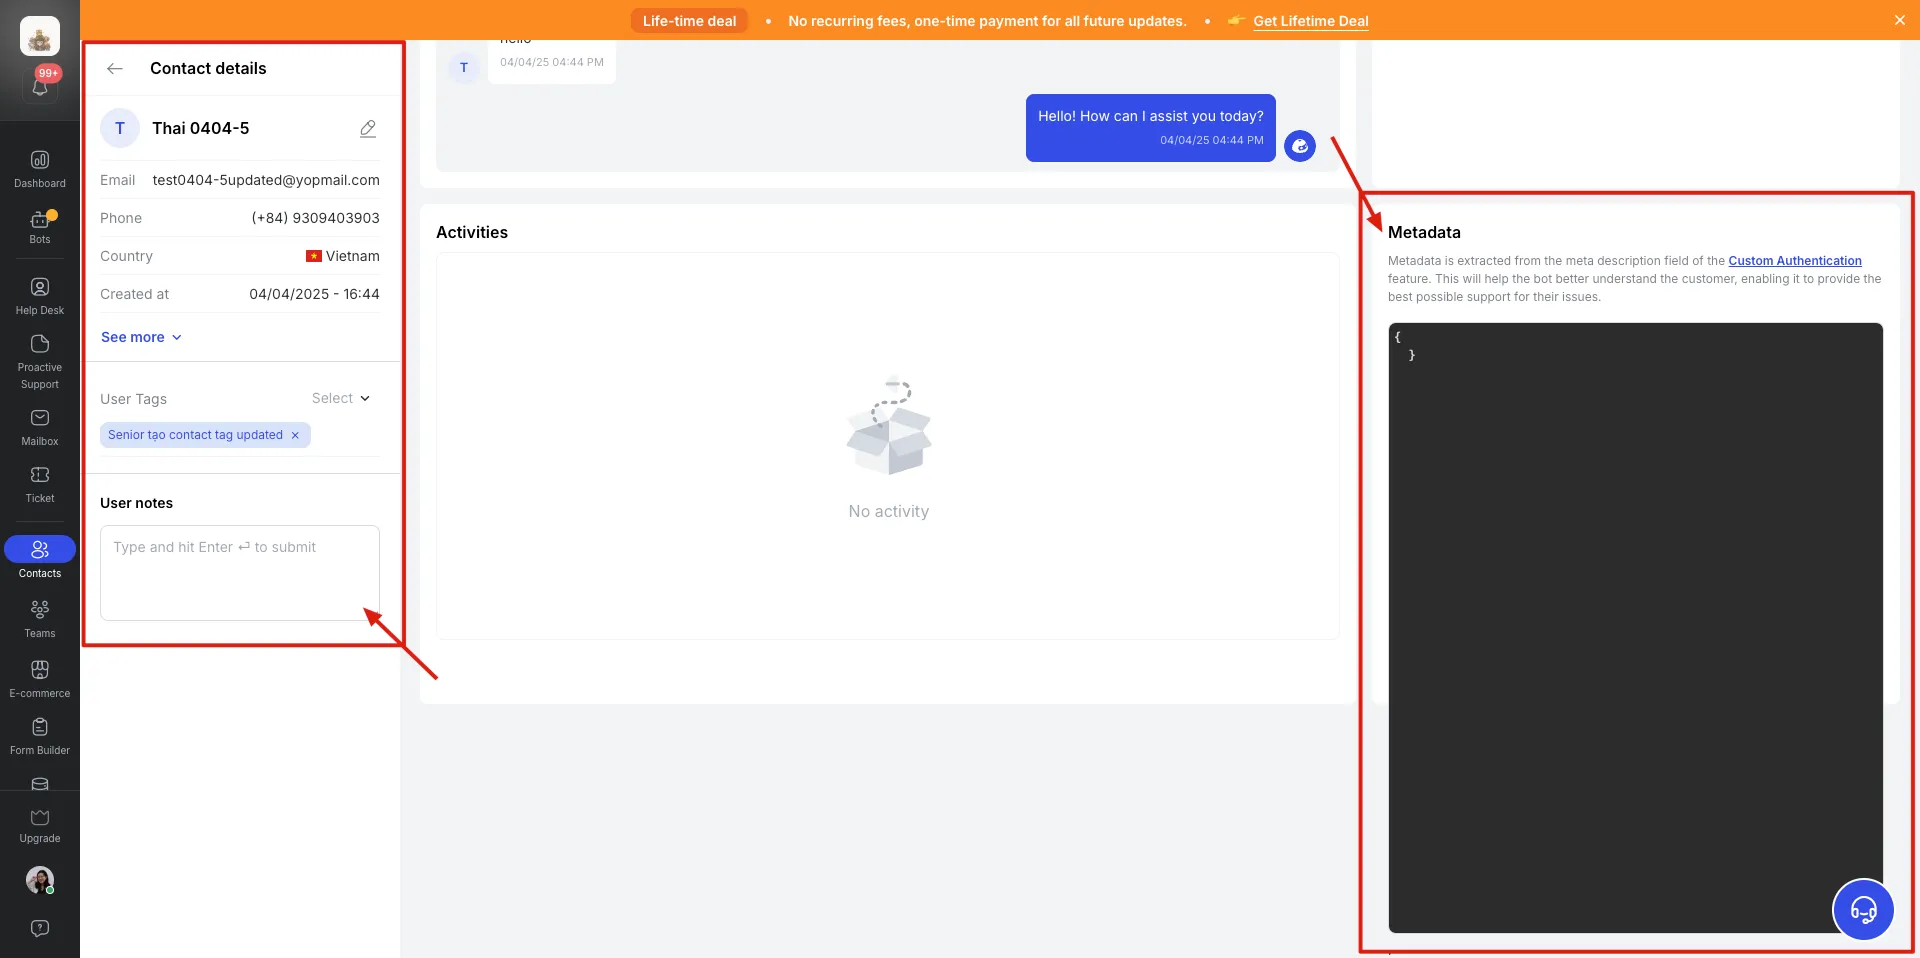
Once the customer information is retrieved, all relevant details will be displayed in the **Contact Details** section.
**Analogy: What information the system receives when Custom Authentication is successfully triggered**
*Think of the user's system as a large hotel.*\
Each room in the hotel represents a customer’s service session — a place where their information is stored. To distinguish between guests, each room has a unique **room number** — and that room number is the **user ID**.
```
{
"data": {
"id": "2",
"name": "Nguyen Van B",
"email": "nguyenvanb@example.com",
"phone_number": "0912345678",
"metadata": {
"gender": "Female",
"address": "456 California St, Los Angeles, CA",
"insurance_code": "INS-982374",
"order_id": "ORD-5578XZ",
"order_quantity": 3
}
}
}
```
In the example above, we're looking at the **room with ID `2`**.
Inside this room, we can see basic customer information, such as:
* **Name** (`name`)
* **Email** (`email`)
* **Phone number** (`phone_number`)
:arrow\_right:But just like a hotel room can come with extras — like a mini bar, laundry service, or special guest notes — the system can also store **additional data** under the section called **`metadata`**.
This is where extra information is stored, such as:
* Home address (`address`)
* Insurance code (`insurance_code`)
* Order ID (`order_id`)
* ...and more
If this is the customer's first interaction or they haven’t used many services yet, the `metadata` section might be empty.
Once everything is set up, you can use the **Testing** section to check whether the system can successfully call the API and retrieve the customer data.
### Custom Authentication Disable Flow
If Custom Authentication is turned off or fails to work for any reason, the system will automatically fall back to the default information collection flow. Below are the possible scenarios:
* **Case 1:** When Custom Authentication is not enabled, the chat will proceed using the default **Collect Information** flow.
* **Case 2:** When Custom Authentication is enabled, but the domain is not valid (i.e., the accessed domain is not included in the whitelist), the system will skip CA and use the default **Collect Information** flow.
* **Case 3:** When Custom Authentication fails to start properly, the system will fall back to the default **Collect Information** flow. This failure may be caused by various issues, such as incorrect or missing setup on the user’s side, missing or invalid tokens, or system errors during the process.